Norvitra VHF Simulator
A realistic training environment for VHF maritime radio communication. This guide covers everything you need to operate the simulator — from making your first radio check to completing distress call scenarios.
What the simulator does
The Norvitra VHF Simulator puts you on the bridge of a vessel and connects you to a live AI-powered coast radio station. You operate a realistic VHF radio — changing channels, sending DSC calls, and communicating by voice or text — while the coast radio responds in real time with the correct procedures and appropriate accent for the region.
Scenarios range from routine radio checks to distress calls (MAYDAY), urgency calls (PAN PAN), safety broadcasts (SÉCURITÉ), and more. Each exercise is evaluated and scored against the ITU standard.
System Requirements
| Requirement | Details |
|---|---|
| Browser | Google Chrome or Microsoft Edge (recommended). Firefox supported. Safari supported with limitations. |
| Screen | Minimum 1025px width. Tablet in landscape mode or desktop. Not supported on phones. |
| Microphone | Required for voice input (PTT). Text input is always available as fallback. |
| Speakers / headset | Required to hear coast radio voice responses. |
| Internet | Required. The AI and voice systems require a live connection. |
Interface Overview
The simulator is divided into five main areas:
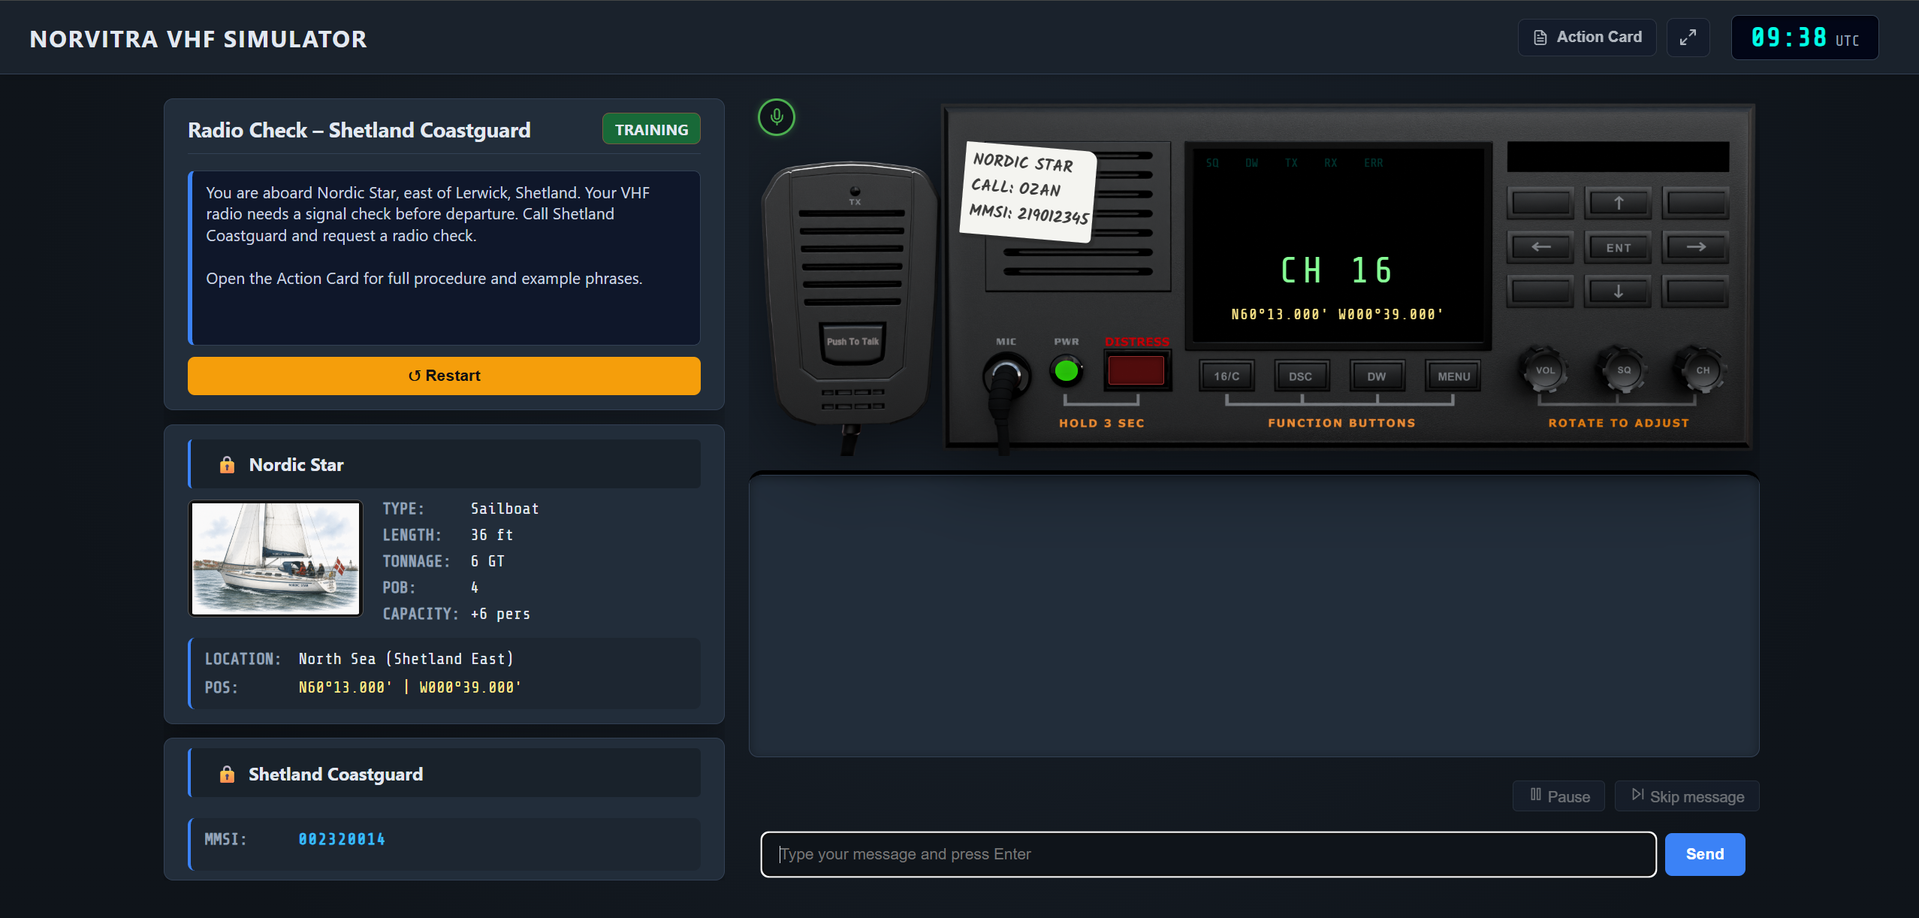
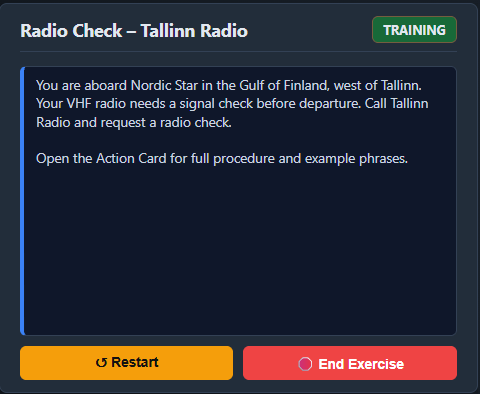
The three information cards
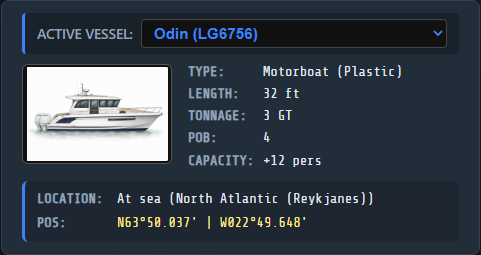
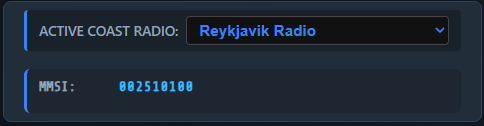
The left column contains three cards that give you all the context you need for the current exercise.
Channels
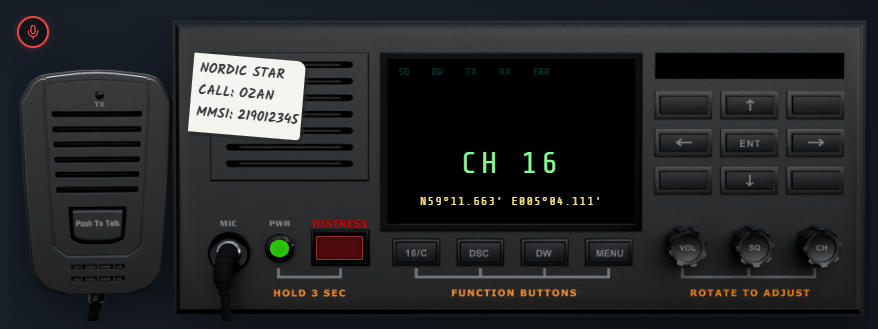
Channel 16 is the international calling and distress channel. All maritime vessels maintain a listening watch on CH16. This is where you make your initial call — the coast radio will then direct you to a working channel for the actual exchange.
Changing channels on the radio
Click and drag the rightmost knob on the radio to scroll through channels, or click the CH button.
The 16/C button on the radio face returns you instantly to Channel 16.
The LCD display shows CH 16 — confirm the correct channel before transmitting.
Common working channels
| Channel | Use |
|---|---|
| CH 16 | International calling and distress. Always monitored. |
| CH 20 | Common working channel for Norwegian Coastal Radio South. |
| CH 67 | Working channel used by some coast radio stations. |
| CH 70 | DSC digital calling only — never used for voice. |
Push to Talk (PTT)
The PTT button activates your microphone and sends your speech to the AI coast radio. Hold it for at least 3 seconds to activate, then speak your message clearly and release.
How to use PTT
The button is on the left side of the radio handset. The mic indicator will turn orange (listening).
Speak clearly at a normal pace. Maritime radio language is formal — use "over" to indicate you are done speaking.
The simulator transcribes your speech and sends it to the coast radio AI. The response appears in the message log and is spoken aloud.
DSC – Digital Selective Calling
DSC is the digital signalling layer of GMDSS. Before making a voice call, you can send a DSC call to the coast radio — the radio then acknowledges, assigns a working channel, and you establish voice contact on that channel.
Sending a DSC routine call
Opens the DSC menu on the radio display.
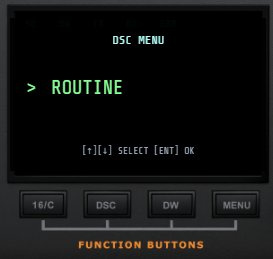
Navigate to Routine call using the arrow buttons.
Type the 9-digit MMSI of the coast radio (e.g. 002570000 for Norwegian Coastal Radio South).
The DSC call is transmitted. Wait for the acknowledgement (DSC Ack).
Your radio switches automatically. Pick up the handset and initiate voice contact — it is your responsibility to call first after DSC.
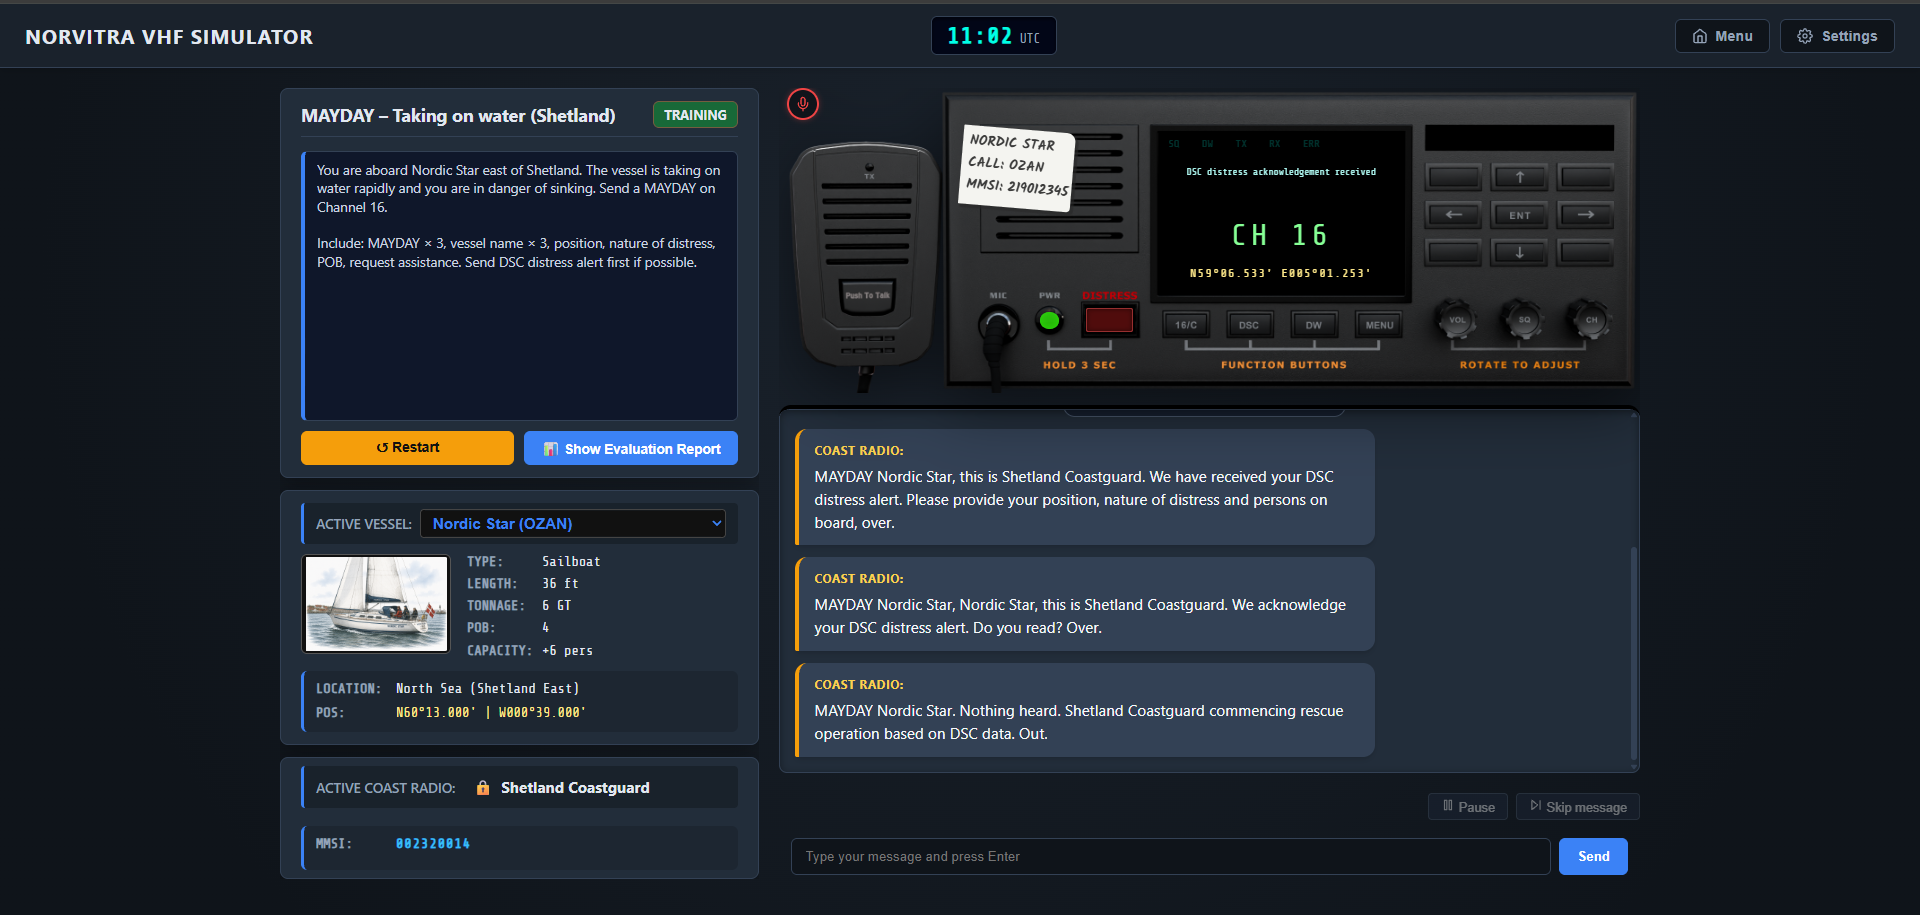
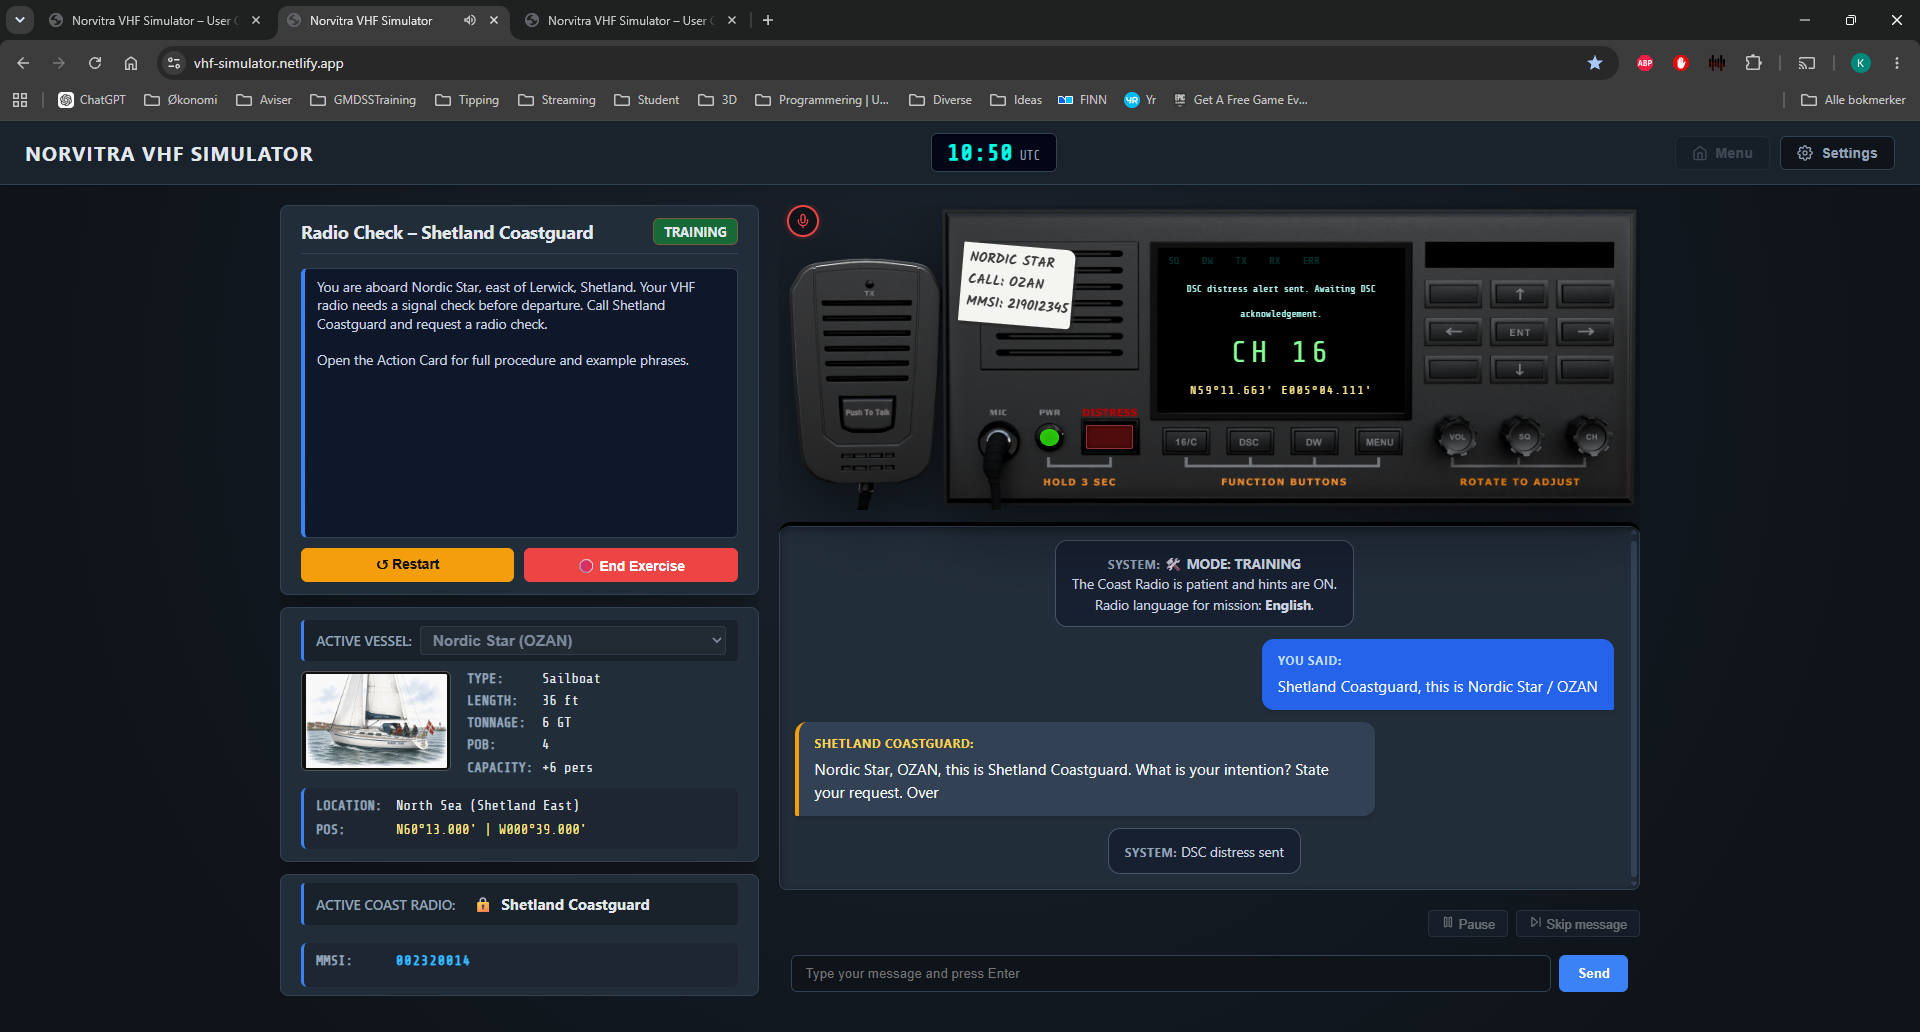
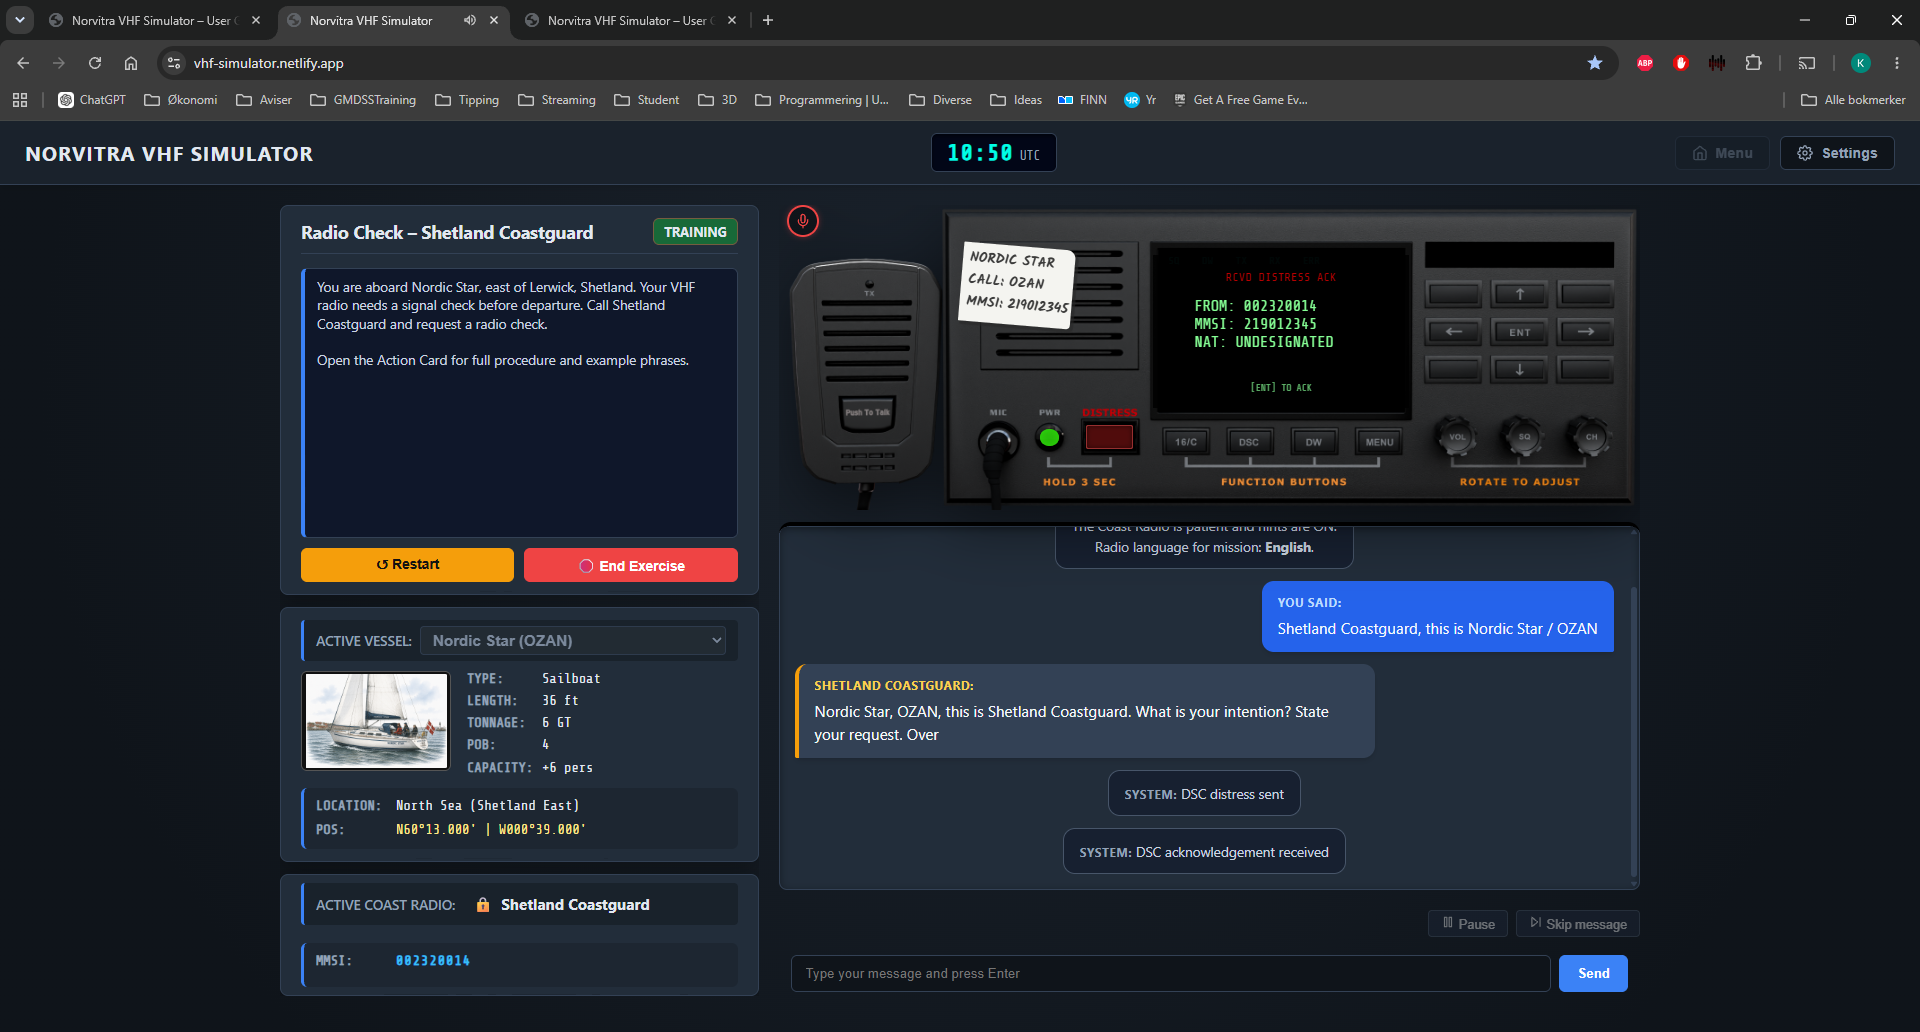
DSC Distress sequence
The following sequence shows what happens when a DSC distress alert is sent:
Making Contact
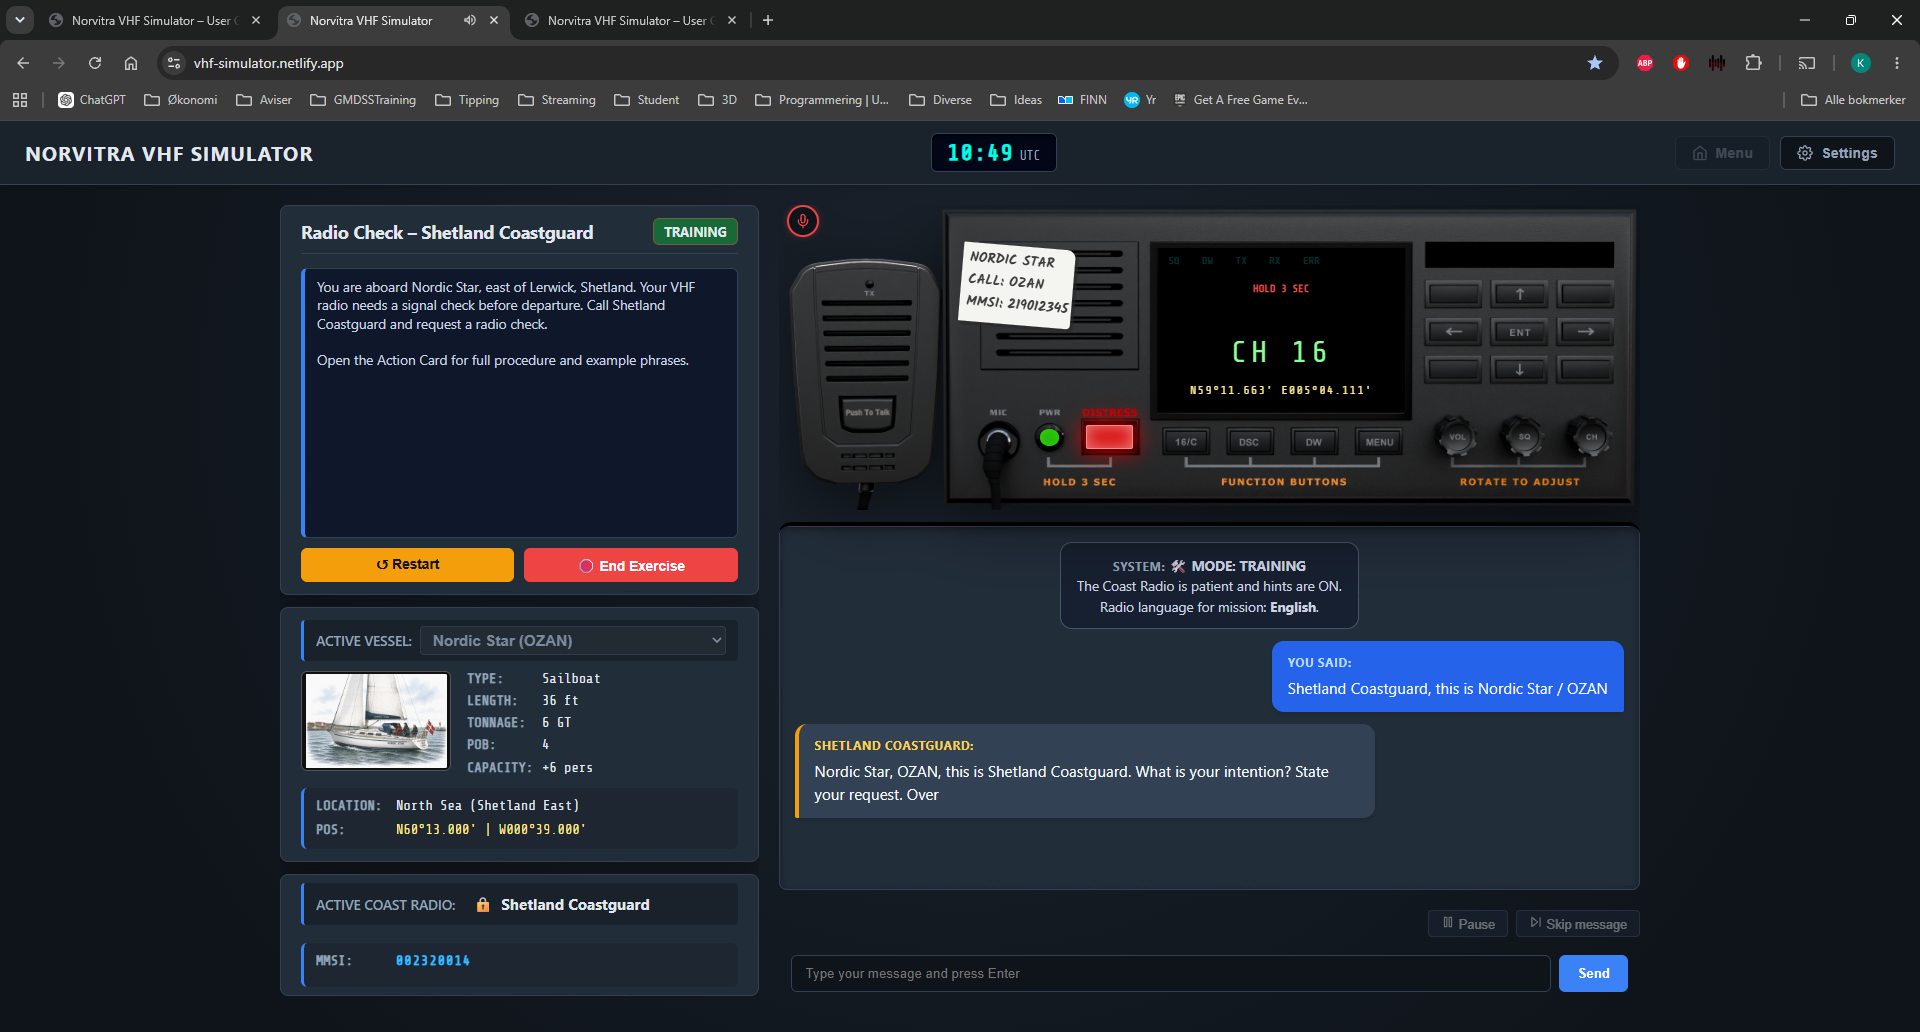
All radio calls follow the same structure: identify the station you are calling, identify yourself, and state your purpose. Repeat the station name three times on first contact.
Standard call format (CH 16)
This is [vessel name], [vessel name], [vessel name].
Callsign [phonetic callsign].
[Purpose of call], over.
Switch to channel twenty – channel two zero, over.
After switching channels, re-establish contact with full identification and state your purpose again.
Message Log
The message log displays the complete communication history for your current session. Your messages appear on the right; coast radio messages appear on the left.
Use the Pause button to pause the coast radio's spoken response. Use Skip message to advance to the next response immediately.
Radio Check
A radio check confirms that your radio is transmitting and receiving correctly. It is standard procedure before departure. There are three methods:
Method 1 — Call on Channel 16
This is [vessel], [vessel], [vessel].
Callsign [phonetic]. Radio check, over.
Switch to channel twenty – channel two zero, over.
Switch to channel 20, re-establish contact, and complete the radio check on the working channel.
Method 2 — Call directly on a working channel
This is [vessel]. Callsign [phonetic].
Radio check on channel twenty – channel two zero, over.
You are loud and clear, over.
Method 3 — DSC Routine call
Send a DSC Routine call to the coast radio MMSI. After acknowledgement, switch to the assigned channel and initiate voice contact for the radio check.
Being Understood — Best Practice
The simulator uses speech recognition and language processing to interpret what you say. Like a real coast radio operator, it reads your words as they come — with no prior knowledge of who is calling. The clearer your identification, the more reliably it will respond correctly.
The ambiguity problem
Consider this transmission: "This is Sea Hawk". Is Sea Hawk the vessel name, or is Hawk the callsign? A coast radio operator — human or AI — cannot know without more context. This is exactly why ITU-R M.1171-1 requires callsigns to be stated explicitly and separately from vessel names.
How to make yourself clear
Use a natural pause or the word "callsign" to separate them. Never run them together.
This is the most reliable method — the simulator will always parse correctly when you say the word "callsign".
Spell your callsign using the NATO phonetic alphabet. This is correct procedure and also the most reliable for speech recognition.
When typing your message, a slash ( / ) is a clear separator that the simulator always recognises.
Examples — from ambiguous to clear
Problem: is "Hawk" a callsign or part of the vessel name?
No ambiguity — but the simulator will still ask for your callsign.
Microphone & Voice
The simulator uses your microphone to capture your radio transmissions. Speak clearly at a normal pace when the PTT button is active — the simulator transcribes your speech and sends it to the coast radio AI.
If voice recognition is unavailable or not working, the text input field at the bottom of the screen is always available as an alternative. Type your message and press Enter — it works identically to speaking.
Microphone Calibration Full version
The simulator does not just record you — it transcribes what you say and grades it. If it mishears your callsign or your position, the exercise fails for the wrong reason. Calibration is how you find out, before it costs you a mark, whether the simulator can hear you clearly.
It runs the first time in the course lesson Before we begin → Set up your microphone. You can start it again at any time from the microphone icon (🎙️) in the simulator's top bar.
What happens
You read four short lines. For each one you press START RECORDING, wait for the countdown, read the line aloud, and press STOP RECORDING. The simulator then shows you two things: exactly what it heard, and a diagnosis of your audio level. A summary at the end tells you how many of the four came through.
| Test | What it checks |
|---|---|
| 1 · Emergency situation | Ordinary speech at radio pace. Sets the baseline level. |
| 2 · MMSI | Nine digits in a row — the hardest thing for speech recognition to get right. |
| 3 · Position | Degrees and minutes, read digit by digit. |
| 4 · Identity and callsign | The phonetic alphabet, and letters mixed with digits. |
Reading the level bar
The bar moves while you are recording. The two marks on it are not decoration — they are the working range.
Below 15 the speech recognition has to guess. Above 85 the sound clips: the loudest parts are cut flat, and whole words disappear. Steady peaks in the middle band are what you want.
Distance to the microphone
Distance matters more than any setting. Too far away and the room is louder than you are; too close and your breath and plosives overload the input.
Aim the microphone past the corner of your mouth rather than straight at it. That keeps the p- and b-sounds from hitting the capsule directly, without losing any level.
Mic Boost
Mic Boost is the slider next to the level bar. It turns your microphone up or down inside the simulator, after the microphone and before anything listens — so it changes both the bar and what the speech recognition receives. Your browser's own automatic level control is switched off deliberately, which makes this the only volume control in the chain.
| The simulator says | What to do |
|---|---|
| Weak signal | Move closer first. Raise Boost a little only if you are already at a sensible distance. |
| Audio clipping | Lower Boost, or move back. Both work; distance is the more reliable of the two. |
| Noise | Boost is amplifying the room. Move closer and lower Boost — that improves your voice relative to the noise, which raising Boost never does. |
| Clarity | The level is fine; the words were not. See the next section. |
Speaking clearly
Radio speech is not ordinary speech. The simulator is tuned for the real thing, and so is the examiner.
| Rule | Why |
|---|---|
| Even pace, no rushing | The transcription needs the gaps between words to find the word boundaries. |
| Do not shout | Shouting distorts and compresses. It reads as clipping, not as clarity. |
| Digits one at a time | “Two — five — seven”, never “two hundred and fifty-seven”. This is correct radio procedure, and it is the form the simulator is built to read. |
| Positions digit by digit too | “Five nine degrees, two two decimal five minutes north” — not “fifty-nine” and “twenty-two”. |
| Callsigns in phonetics | LG6756 is “Lima Golf Six Seven Five Six”. Letters on their own are too easily confused. |
Language Settings Full version
The simulator supports three language modes:
| Setting | Effect |
|---|---|
| UI Language | The interface language — labels, buttons and menus. Choose Norwegian, English, or German. |
| Radio Language | The language of radio procedures. English is the international standard (ITU-R). Norwegian available for Norwegian waters. |
| TTS Voice | The coast radio voice. Automatically matched to the selected coast radio and region — British English for UK stations, Danish for Lyngby Radio, etc. |
Your Vessel Full version
In the full version, you can select from multiple vessels. Each vessel has a unique name, callsign, MMSI, type, and home port. The vessel information is used in all radio procedures — make sure you know your vessel's callsign in phonetics before starting an exercise.
Vessel data
| Field | Description |
|---|---|
| Name | Your vessel name. Used in all radio calls. |
| Callsign | 4-letter radio callsign. Always spoken in phonetics (e.g. OZAN → Oscar Zulu Alpha November). |
| MMSI | 9-digit Maritime Mobile Service Identity. Used for DSC calls. |
| Type / Length / Tonnage | Vessel specification. Required in some distress calls. |
| POB | Persons on board. Required in distress and urgency calls. |
Coast Radio Station Full version
The full version includes 10 coast radio stations across Europe, Asia-Pacific and the Atlantic. Each station has its own MMSI, working channels, TTS voice, and regional accent.
| Station | MMSI | Area | Accent |
|---|---|---|---|
| Norwegian Coastal Radio South | 002570000 | Norwegian coast | Norwegian |
| Shetland Coastguard | 002320014 | North Sea (Shetland) | British English |
| Humber Coastguard | 002320007 | North Sea (Yorkshire) | British English |
| Falmouth MRCC | 002320011 | English Channel | British English |
| Lyngby Radio | 002191000 | Skagerrak / Kattegat | Danish |
| Elbe Weser Radio | 002181000 | German Bight | German |
| Reykjavik Radio | 002510100 | North Atlantic | Icelandic |
| Palma Radio | 002241022 | Mediterranean | Spanish |
| Tallinn Radio | 002760001 | Gulf of Finland | Estonian |
| Manila Radio | 005450099 | South China Sea | Philippine English |
| Sydney Radio | 005030230 | Tasman Sea | Australian English |
When you switch coast radio, your vessel's position automatically moves to within the station's service area, and the TTS voice switches to the correct regional accent.
Scenarios Full version
Scenarios are structured exercises with a specific situation, objective, and evaluation. Each scenario locks the coast radio, vessel, position, and radio language to ensure a realistic and consistent training environment.
Scenario types
| Type | Signal | Description |
|---|---|---|
| Routine | 🟢 | Radio check, link call, DSC test |
| Distress | 🔴 | MAYDAY — immediate danger to life or vessel |
| Urgency | 🟠 | PAN PAN — serious situation, not immediately life-threatening |
| Safety | 🟡 | SÉCURITÉ — navigational or meteorological warning |
| Cancel | 🟢 | Cancelling a false distress alert |
| Relay | 🟠 | Relaying a MAYDAY on behalf of another vessel |
| SAR | 🔴 | Search and rescue coordination |
Starting a scenario
Opens the exercise selection menu.
Select from the list. The briefing panel shows your vessel, position, and objective.
The simulator locks the coast radio and vessel, positions your vessel, and you are ready to communicate.
Free Roam Full version
Free Roam lets you explore the radio freely without a structured exercise. There is no evaluation and no set objective — use it to practice specific phrases, experiment with channels, or get familiar with the interface before attempting a scored scenario.
Evaluation & Scorecard
When you complete a scenario, the simulator presents a scorecard with an evaluation of your performance. The scorecard shows:
| Item | Description |
|---|---|
| Result | Pass / Perfect / Needs improvement |
| Successes | Procedures executed correctly |
| Errors | Missing or incorrect elements |
| Warnings | Minor deviations from standard procedure |
| Violations | Serious procedural breaches |
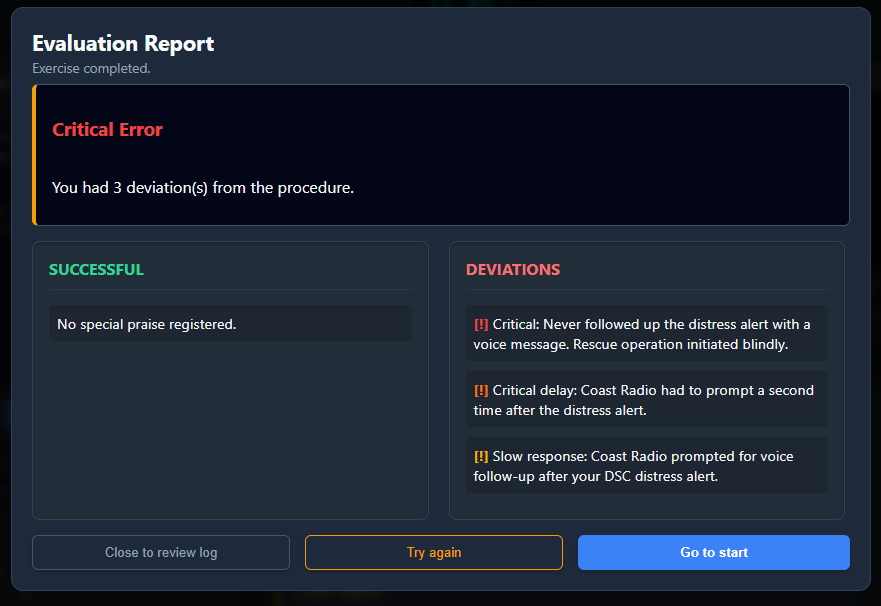
Use Try again to repeat the scenario immediately. Use Close to review log to study the full message history before retrying. Your result is sent to the course platform when the exercise is completed in a lesson.
Action Card
The Action Card is a scenario-specific reference panel that opens as a floating window inside the simulator. It shows the full procedure for the current exercise — including example radio phrases, step-by-step instructions, and vessel data.
Click the Action Card button in the header, next to the clock, to open it. You can drag and resize the panel. It does not affect the exercise or your score.
Fullscreen
The fullscreen button sits in the header beside the Action Card button. When the simulator is embedded in a lesson page it runs in a fairly small frame; fullscreen gives you the whole screen, which makes the channel display and the DSC menu much easier to read.
Press Esc or click the button again to leave fullscreen. The header stays visible either way, so the button is always within reach.
Phonetic Alphabet
All callsigns and letters are spoken using the NATO phonetic alphabet. Memorise this before your first radio exercise.
| Letter | Word | Letter | Word |
|---|---|---|---|
| A | Alpha | N | November |
| B | Bravo | O | Oscar |
| C | Charlie | P | Papa |
| D | Delta | Q | Quebec |
| E | Echo | R | Romeo |
| F | Foxtrot | S | Sierra |
| G | Golf | T | Tango |
| H | Hotel | U | Uniform |
| I | India | V | Victor |
| J | Juliet | W | Whiskey |
| K | Kilo | X | X-ray |
| L | Lima | Y | Yankee |
| M | Mike | Z | Zulu |
Numbers
| Number | Spoken as | Number | Spoken as |
|---|---|---|---|
| 0 | Zero / Nought | 5 | Five / Fife |
| 1 | One / Wun | 6 | Six |
| 2 | Two | 7 | Seven |
| 3 | Three / Tree | 8 | Eight / Ait |
| 4 | Four / Fower | 9 | Nine / Niner |
Troubleshooting
The coast radio does not respond
Make sure you are on the correct channel. The coast radio only responds on its working channels and on Channel 16. If the scenario has started, check the exercise briefing for which channel to use.
Voice recognition is not working
Check that your browser has microphone permission for this site. In Chrome: click the lock icon in the address bar → Microphone → Allow. If recognition still fails, the simulator will automatically fall back to text input.
The coast radio voice is not playing
Click anywhere on the page to unlock audio — browsers require a user gesture before audio can play. If the problem persists, check your system volume and make sure the browser tab is not muted.
The scenario did not start automatically
In course lessons, the scenario should start automatically within a few seconds of the page loading. If it does not, click the Restart button in the exercise panel.
The simulator is too small on my screen
The simulator requires a minimum screen width of 1025 pixels. Use a desktop or laptop computer, or a tablet in landscape mode. The simulator is not supported on phones.